


Synthia V2
Synthia evolves a bit with a much nicer keyboard and some fancier visualizations!
(see also the writeup on Synthia v1 here)
I wanted to keep a non-standard keyboard, but the arcade buttons needed some serious upgrades, more buttons were needed!

Initial keyboard concept. I still wanted something with curves, but it needed more buttons.

Working with Tom @ imagineFORM, this transformed into a beautiful wave pattern.
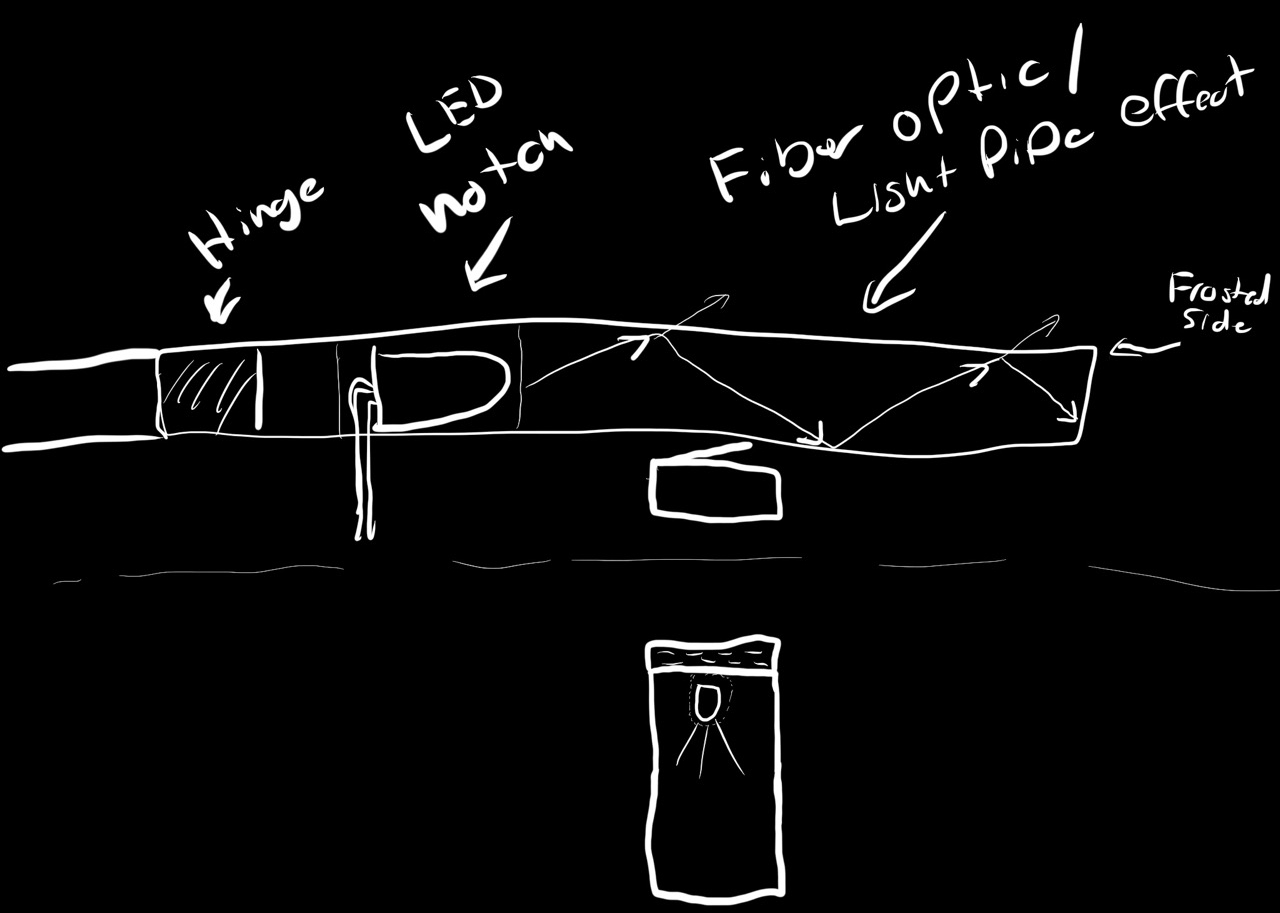
Thinking about how light will travel though the keys. Light bounces around inside the acrylic unless the angle is extreme enough, such as the edges or a frosted side that has been scuffed up (the many tiny scratches provide plenty of angles to let light escape).

Wiring these up
Strandtest on early keyboard. The poor laser cut hinges didn't work so well in acrylic, but the light guide/spread is amazing!

Wiring up the keyboard microswitches

I2C IO expander board to run the keys, and an LED to know it's working. Pretty happy with the home etched PCB at this 0.65mm pin pitch.
I also wanted to see if I could make a more interesting selection dial for the synth controls. I thought a touchwheel would be pretty cool, and I had some PCB that was thin enough to be semitransparent. A NeoPixel ring and a meshed touch sensor PCB where combined!
Playing around with a touchweel input, some pixels, and an OLED display to create a scrolling selection interface. I didn't end up keeping the OLED display, but I think something like this will eventually make it's way into Synthia.
I've put the code for the TouchWheel up on GitHub and it should be available in the Arduino library manager.

Light test of the assembled result, hinges created out of polycarbonate flaps, touch sensors mounted. It really came out better than I could have hoped for!
The keyboard has the same features as v1. The key colors represent a note in an octave, and there's a touch slider to control the music scale, and a dial for pitch. The notes and colors are recalculated on the fly. It's pretty beginner friendly.
Instead of strips of LEDs behind a sheet of polycarbonate, I went with a waveguide that channels the light. Tom and I tossed around a few ideas, and his wave+wave design looked really slick.
Early test of the waveguide display
Since I have so many keys, but only 8 waveguides, I can't just shoot light beams like I did in v1, so I went with a sound based visualizer that looks good on the waveguides. I used Fast Fourier Transforms to get frequency data from the synth output, then convert that back into notes, then visualize the note, octave and intensity though sine waves. The idea is to "see" the music.
Early FFT visualizer. Animation needs a bit of work, but it's plotting out the basics.

First light up test of the new display all wired. It was not without a few problems...
The display is made up of high density (144 pixels per meter) ws2812 LEDs which are driven by FadeCandy controllers.
I picked up the LEDs in Shenzhen Huaqiangbei markets during a trip in 2015 for a too-good-to-be-true price. If you've never been, it is pretty much the electronics hardware capital of the world. I didn't have much luck with the stuff I bought there though. Some things I knew were too good to be true, like that 128G SD card, yeah, it only keeps 8g of that! These strips were no exception.
I had tons of problems with dead pixels and flickering intermittently. For a while I ended up running everything at 50% brightness which seemed to help. Eventually I had to tear everything apart and replace the strips.
Problems aside, seeing it light up and animate to some notes was possibly one of the most beautiful LED things I've seen. I'm biased though :)

Everything together, with my brother manning the keyboard. YES!
I think it turned out quite well. I've taken it to burning man, local Maker Fairs, and a few First Fridays. People have a blast playing it, and I'm already thinking of ideas for Synthia v3.
If you haven't already, check out the video (above) I made of my brother messing around on it (he is much more musically inclined than I am!).
Speaking of my brother, check out his original music here.

